
The LAMP stack is a group of open-source software that is usually installed together to enable a server to host websites and web applications. The acronym represents L for the Linux Operating System, A for Apache HTTPD Web Server, M for MySQL, and P for PHP. In this tutorial, we will cover how to install the LAMP stack on Ubuntu Linux.
Update Software Packages
Before we start the installation it is a good idea to update software packages with the following command:
sudo apt update Install Apache Httpd Web Server
Next, we will install Apache HTTPd Web Server:
sudo apt install -y apache2 apache2-utilsOnce the installation is completed the Apache service should be automatically started. Check Apache’s status with systemctl:
sudo systemctl status apache2The output would look something like the following:
 apache2.service - The Apache HTTP Server
   Loaded: loaded (/lib/systemd/system/apache2.service; enabled; vendor preset: enabled)
  Drop-In: /lib/systemd/system/apache2.service.d
           └─apache2-systemd.conf
   Active: active (running) since Sat 2018-09-08 10:46:05 UTC; 3min 37s ago
 Main PID: 1610 (apache2)
    Tasks: 55 (limit: 505)
   CGroup: /system.slice/apache2.service
           ├─1610 /usr/sbin/apache2 -k start
           ├─1612 /usr/sbin/apache2 -k start
           └─1613 /usr/sbin/apache2 -k start
If it is a case that Apache is not running then run the following command:
sudo systemctl start apache2Also, configure Apache to start automatically when your server boots up:
sudo systemctl enable apache2Ensure that the HTTP firewall rule is enabled:
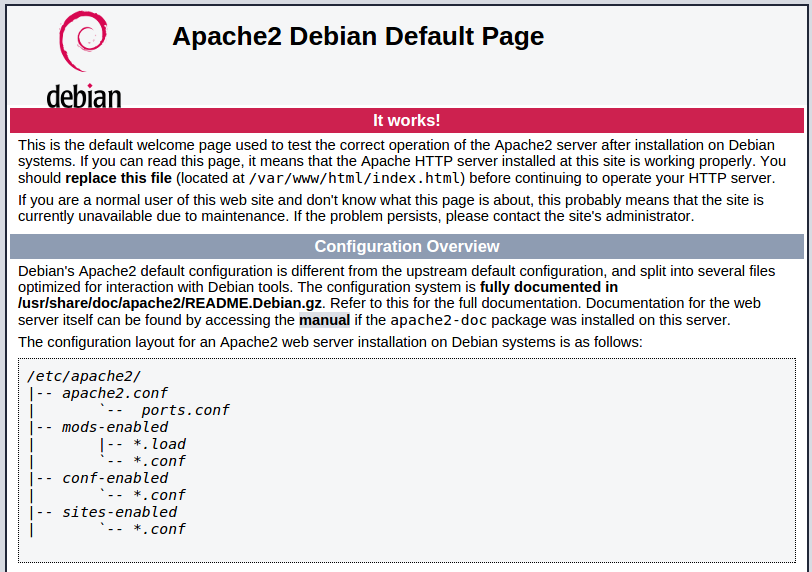
sudo ufw allow httpOnce you completed installing the Apache HTTPd webserver you can type in the server up address in your web browser to see the Apache webserver default page.
Install MySQL(MariaDB)
Once the webserver is up and running we will install MySQL(MariaDB) next. MariaDB is a community-developed fork of the MySQL relational database management system. Run the following command to start installing MariaDB:
sudo apt install mariadb-server mariadb-clientOnce the installation is completed you should check the status to see if MariaDB is active with the following command:
sudo systemctl status mariadbSample output:
mariadb.service - MariaDB 10.1.34 database server
   Loaded: loaded (/lib/systemd/system/mariadb.service; enabled; vendor preset: enabled)
   Active: active (running) since Sat 2018-09-08 11:13:27 UTC; 21s ago
     Docs: man:mysqld(8)
           http://mariadb.com/kb/en/library/systemd/
 Main PID: 3473 (mysqld)
   Status: "Taking your SQL requests now..."
    Tasks: 27 (limit: 505)
   CGroup: /system.slice/mariadb.service
           └─3473 /usr/sbin/mysqld
If it is not running you can start the MariaDB server with the following command:
sudo systemctl start mariadbThe next step is to enable MariaDB to start automatically at system boot:
sudo systemctl enable mariadbOnce the MariaDB service is up and running, the next step is to start the MySQL installation script:
sudo mysql_secure_installationWhen it prompts you for the MariaDB root password you can go ahead and press enter and then enter y to set the root password for the MariaDB server. Next, you can press enter through the remaining steps which will remove the anonymous user, disable remote root login, and remove the test database.
Install PHP
The last step is to install PHP on your Ubuntu Linux server or instance:
sudo apt-get install php libapache2-mod-php php-mysqlOnce PHP is installed create a script info.php under the webroot directory:
sudo vi /var/www/html/info.phpThe script will create a blank file and then we will add the following PHP code inside the file:
<?php
phpinfo();
?>
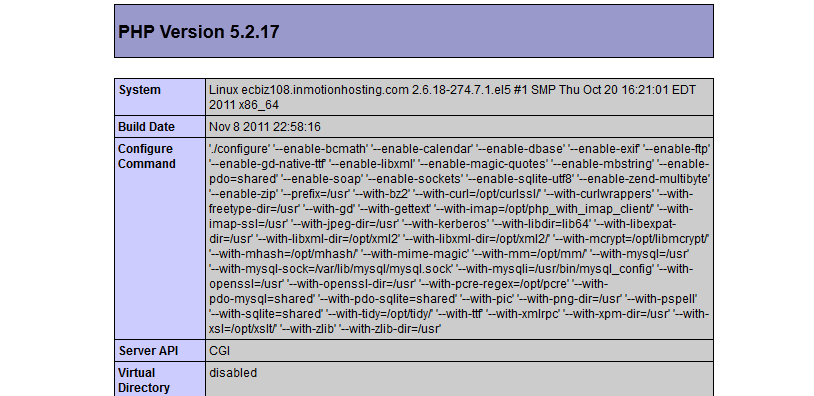
Once all the above steps are completed view the info.php page in the web browser using the server IP:
http://<server_ip_address>/info.phpThe page will look similar to the one below:
Conclusion
In conclusion, Apache HTTP Web Server is still very much popular today and the LAMP stack is utilized by many developers. If you enjoyed this article consider signing up for our newsletter and don't forget to share it with people that would find it useful. Leave a comment below with a tutorial you would like us to cover.