

Wazuh is an open-source security information and event management (SIEM) solution that helps you to detect, investigate, and respond to security threats. It is a comprehensive platform that is easy to deploy and self-host in order to achieve security goals. This platform comes with many features such as threat intelligence, security ops, endpoint security, and cloud security. Let's dive into the steps to deploy Wazuh with Docker and connect Wazuh agents to operating systems.
Clone Wazuh Docker Github Repo And Generate Certificates
The first step is to clone the Wazuh Docker repository to your docker host that you want to deploy Wazuh Server to and then navigate to the single-node directory in the wazuh-docker directory.
 wazuh
wazuhOnce in the singe-node repo run the following command to generate the certificates. docker-compose -f generate-indexer-certs.yml run --rm generator - you should see similar CLI output like the below image.

Wazuh Docker Compose Deployment
Once the certificate generation is completed successfully go ahead and run docker-compose up -d to deploy the Wazuh Server containers. The docker-compose file in the cloned repo should look similar to the below docker-compose script.
version: '3.7'

services:
  wazuh.manager:
    image: wazuh/wazuh-manager:4.4.5
    hostname: wazuh.manager
    restart: always
    ports:
      - "1514:1514"
      - "1515:1515"
      - "514:514/udp"
      - "55000:55000"
    environment:
      - INDEXER_URL=https://wazuh.indexer:9200
      - INDEXER_USERNAME=admin
      - INDEXER_PASSWORD=SecretPassword
      - FILEBEAT_SSL_VERIFICATION_MODE=full
      - SSL_CERTIFICATE_AUTHORITIES=/etc/ssl/root-ca.pem
      - SSL_CERTIFICATE=/etc/ssl/filebeat.pem
      - SSL_KEY=/etc/ssl/filebeat.key
      - API_USERNAME=wazuh-wui
      - API_PASSWORD=MyS3cr37P450r.*-
    volumes:
      - wazuh_api_configuration:/var/ossec/api/configuration
      - wazuh_etc:/var/ossec/etc
      - wazuh_logs:/var/ossec/logs
      - wazuh_queue:/var/ossec/queue
      - wazuh_var_multigroups:/var/ossec/var/multigroups
      - wazuh_integrations:/var/ossec/integrations
      - wazuh_active_response:/var/ossec/active-response/bin
      - wazuh_agentless:/var/ossec/agentless
      - wazuh_wodles:/var/ossec/wodles
      - filebeat_etc:/etc/filebeat
      - filebeat_var:/var/lib/filebeat
      - ./config/wazuh_indexer_ssl_certs/root-ca-manager.pem:/etc/ssl/root-ca.pem
      - ./config/wazuh_indexer_ssl_certs/wazuh.manager.pem:/etc/ssl/filebeat.pem
      - ./config/wazuh_indexer_ssl_certs/wazuh.manager-key.pem:/etc/ssl/filebeat.key
      - ./config/wazuh_cluster/wazuh_manager.conf:/wazuh-config-mount/etc/ossec.conf

  wazuh.indexer:
    image: wazuh/wazuh-indexer:4.4.5
    hostname: wazuh.indexer
    restart: always
    ports:
      - "9200:9200"
    environment:
      - "OPENSEARCH_JAVA_OPTS=-Xms512m -Xmx512m"
    ulimits:
      memlock:
        soft: -1
        hard: -1
      nofile:
        soft: 65536
        hard: 65536
    volumes:
      - wazuh-indexer-data:/var/lib/wazuh-indexer
      - ./config/wazuh_indexer_ssl_certs/root-ca.pem:/usr/share/wazuh-indexer/certs/root-ca.pem
      - ./config/wazuh_indexer_ssl_certs/wazuh.indexer-key.pem:/usr/share/wazuh-indexer/certs/wazuh.indexer.key
      - ./config/wazuh_indexer_ssl_certs/wazuh.indexer.pem:/usr/share/wazuh-indexer/certs/wazuh.indexer.pem
      - ./config/wazuh_indexer_ssl_certs/admin.pem:/usr/share/wazuh-indexer/certs/admin.pem
      - ./config/wazuh_indexer_ssl_certs/admin-key.pem:/usr/share/wazuh-indexer/certs/admin-key.pem
      - ./config/wazuh_indexer/wazuh.indexer.yml:/usr/share/wazuh-indexer/opensearch.yml
      - ./config/wazuh_indexer/internal_users.yml:/usr/share/wazuh-indexer/opensearch-security/internal_users.yml

  wazuh.dashboard:
    image: wazuh/wazuh-dashboard:4.4.5
    hostname: wazuh.dashboard
    restart: always
    ports:
      - 443:5601
    environment:
      - INDEXER_USERNAME=admin
      - INDEXER_PASSWORD=SecretPassword
      - WAZUH_API_URL=https://wazuh.manager
      - DASHBOARD_USERNAME=kibanaserver
      - DASHBOARD_PASSWORD=kibanaserver
      - API_USERNAME=wazuh-wui
      - API_PASSWORD=MyS3cr37P450r.*-
    volumes:
      - ./config/wazuh_indexer_ssl_certs/wazuh.dashboard.pem:/usr/share/wazuh-dashboard/certs/wazuh-dashboard.pem
      - ./config/wazuh_indexer_ssl_certs/wazuh.dashboard-key.pem:/usr/share/wazuh-dashboard/certs/wazuh-dashboard-key.pem
      - ./config/wazuh_indexer_ssl_certs/root-ca.pem:/usr/share/wazuh-dashboard/certs/root-ca.pem
      - ./config/wazuh_dashboard/opensearch_dashboards.yml:/usr/share/wazuh-dashboard/config/opensearch_dashboards.yml
      - ./config/wazuh_dashboard/wazuh.yml:/usr/share/wazuh-dashboard/data/wazuh/config/wazuh.yml
    depends_on:
      - wazuh.indexer
    links:
      - wazuh.indexer:wazuh.indexer
      - wazuh.manager:wazuh.manager

volumes:
  wazuh_api_configuration:
  wazuh_etc:
  wazuh_logs:
  wazuh_queue:
  wazuh_var_multigroups:
  wazuh_integrations:
  wazuh_active_response:
  wazuh_agentless:
  wazuh_wodles:
  filebeat_etc:
  filebeat_var:
  wazuh-indexer-data:
Once the Wazuh containers deployment is completed successfully you should see a similar output on the CLI.

Once you confirm that your Wazuh containers are up and running you need to create a local DNS record depending on where you deploy it. In my capacity, I am self-hosting it inside my local network and creating a DNS record called wazuh.local and pointing it to the IP address of the docker host. Navigate to the web dashboard https://wazuh.local and you should be able to access it with the following default username and password depending if you changed it in your docker-compose.yml.
Username: admin
Password: SecretPassword


Deploy Wazuh Agent To An Operating System
Once logged into the admin dashboard we are going to go ahead and deploy our first by clicking on the Add agent button.

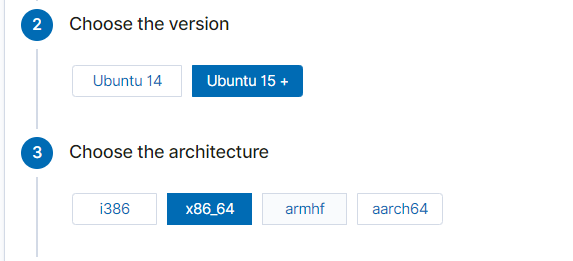
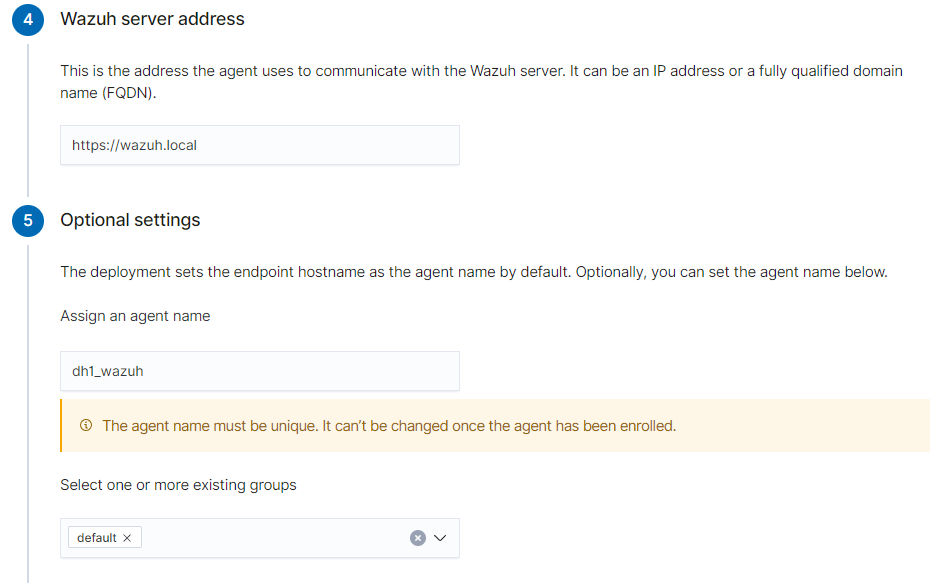
I am deploying an Ubuntu agent and once clicked on the Ubuntu button you will be prompted for the OS version and architecture and follow the rest of the prompts like in the example below specifying the Wazuh server address and agent name.
![[Pasted image 20230723211820.png]]
Copy the command below that you get once selecting all the above options and run it on the system you want to deploy the Wazuh agent.
Once your Wazuh agent is installed successfully run the below commands to start the agent daemon and enable automatic startup of the service at startup.
sudo systemctl daemon-reload
sudo systemctl enable wazuh-agent
sudo systemctl start wazuh-agent
It will take a few minutes to sync with Wazuh and once it starts syncing you can log in to the dashboard and view your client under the agent tab. Wazuh will summarize security events, integrity monitoring, and vulnerabilities, generate steps to become more compliant and secure, and much more.
Conclusion
In conclusion, Wazuh is an incredible free and open-source SIEM platform utilized by even enterprise companies globally. Set up Wazuh and agents and experiment with the flexibility and rich features of the SIEM platform. If you enjoyed this article consider signing up for our newsletter and don't forget to share it with people that would find it useful. Leave a comment below with a tutorial you would like us to cover.