

Using Proxmox and looking to automate your image builds and build custom images to deploy your virtual machines on Proxmox? Well, Hashicorp’s Packer is just the tool to use for this scenario. In this tutorial, I am going to show you step-by-step how to build custom images with Packer for Proxmox, so without further ado, let’s dive in.
Install Packer
You can install Packer with one simple command depending on your operating system.
MacOS – ensure that you have brew package manager installed:
brew tap hashicorp/tap
brew install hashicorp/tap/packer
Windows – use the PowerShell terminal and ensure you have chocolatey package manager installed:
choco install packerLinux – Ubuntu/Debian:
wget -O- https://apt.releases.hashicorp.com/gpg | gpg --dearmor | sudo tee /usr/share/keyrings/hashicorp-archive-keyring.gpg
echo "deb [signed-by=/usr/share/keyrings/hashicorp-archive-keyring.gpg] https://apt.releases.hashicorp.com $(lsb_release -cs) main" | sudo tee /etc/apt/sources.list.d/hashicorp.list
sudo apt update && yes | sudo apt install packer
Linux – Fedora:
sudo dnf install -y dnf-plugins-core
sudo dnf config-manager --add-repo https://rpm.releases.hashicorp.com/fedora/hashicorp.repo
sudo dnf -y install packer
Create API Token For Proxmox User
Next, we should log in to the Proxmox VE dashboard and navigate to -> Datacenter -> Permissions -> API Tokens and add a new API token for your user (can be any user with root permissions) and remember to deselect Privilege Separation. Create and copy your token secret and add it to the credentials file in your packer image build repository.

Create Packer Code Repository
Create a Packer code repository and create the files and folders below accordingly. Copy the code below to each file and edit it according to your environment. You can also go to the template repository here and copy the code from there.

ubuntu-server-focal-docker.pkr.hcl
# Ubuntu Server Focal Docker
# ---
# Packer Template to create an Ubuntu Server (Focal) with Docker on Proxmox

# Variable Definitions
variable "proxmox_api_url" {
    type = string
}

variable "proxmox_api_token_id" {
    type = string
}

variable "proxmox_api_token_secret" {
    type = string
    sensitive = true
}

# Resource Definiation for the VM Template
source "proxmox" "ubuntu-server-focal-docker" {

    # Proxmox Connection Settings
    proxmox_url = "${var.proxmox_api_url}"
    username = "${var.proxmox_api_token_id}"
    token = "${var.proxmox_api_token_secret}"
    insecure_skip_tls_verify = true

    # VM General Settings
    node = "proxmox_node" # add your proxmox node
    vm_id = "100"
    vm_name = "ubuntu-server-focal-docker"
    template_description = "Ubuntu Server Focal Image with Docker pre-installed"

    # VM OS Settings
    # (Option 1) Local ISO File - Download Ubuntu ISO and Upload To Proxmox Server
    iso_file = "local:iso/ubuntu-22.04.1-live-server-amd64.iso"
    # - or -
    # (Option 2) Download ISO
    # iso_url = "https://releases.ubuntu.com/20.04/ubuntu-20.04.3-live-server-amd64.iso"
    # iso_checksum = "f8e3086f3cea0fb3fefb29937ab5ed9d19e767079633960ccb50e76153effc98"
    iso_storage_pool = "local"
    unmount_iso = true

    # VM System Settings
    qemu_agent = true

    # VM Hard Disk Settings
    scsi_controller = "virtio-scsi-pci"

    disks {
        disk_size = "20G"
        format = "qcow2"
        storage_pool = "local-lvm"
        storage_pool_type = "lvm"
        type = "virtio"
    }

    # VM CPU Settings
    cores = "1"

    # VM Memory Settings
    memory = "2048"

    # VM Network Settings
    network_adapters {
        model = "virtio"
        bridge = "vmbr0"
        firewall = "false"
    }

    # VM Cloud-Init Settings
    cloud_init = true
    cloud_init_storage_pool = "local-lvm"

    # PACKER Boot Commands
    boot_command = [
        "<esc><wait><esc><wait>",
        "<f6><wait><esc><wait>",
        "<bs><bs><bs><bs><bs>",
        "autoinstall ds=nocloud-net;s=http://{{ .HTTPIP }}:{{ .HTTPPort }}/ ",
        "--- <enter>"
    ]
    boot = "c"
    boot_wait = "5s"

    # PACKER Autoinstall Settings
    http_directory = "http"
    # (Optional) Bind IP Address and Port
    # http_bind_address = "0.0.0.0"
    # http_port_min = 8802
    # http_port_max = 8802

    ssh_username = "your-user-name"

    # (Option 1) Add your Password here
    # ssh_password = "your-password"
    # - or -
    # (Option 2) Add your Private SSH KEY file here
    # ssh_private_key_file = "~/.ssh/id_rsa"

    # Raise the timeout, when installation takes longer
    ssh_timeout = "20m"
}

# Build Definition to create the VM Template
build {

    name = "ubuntu-server-focal-docker"
    sources = ["source.proxmox.ubuntu-server-focal-docker"]

    # Provisioning the VM Template for Cloud-Init Integration in Proxmox #1
    provisioner "shell" {
        inline = [
            "while [ ! -f /var/lib/cloud/instance/boot-finished ]; do echo 'Waiting for cloud-init...'; sleep 1; done",
            "sudo rm /etc/ssh/ssh_host_*",
            "sudo truncate -s 0 /etc/machine-id",
            "sudo apt -y autoremove --purge",
            "sudo apt -y clean",
            "sudo apt -y autoclean",
            "sudo cloud-init clean",
            "sudo rm -f /etc/cloud/cloud.cfg.d/subiquity-disable-cloudinit-networking.cfg",
            "sudo sync"
        ]
    }

    # Provisioning the VM Template for Cloud-Init Integration in Proxmox #2
    provisioner "file" {
        source = "files/99-pve.cfg"
        destination = "/tmp/99-pve.cfg"
    }

    # Provisioning the VM Template for Cloud-Init Integration in Proxmox #3
    provisioner "shell" {
        inline = [ "sudo cp /tmp/99-pve.cfg /etc/cloud/cloud.cfg.d/99-pve.cfg" ]
    }

    # Provisioning the VM Template with Docker Installation #4
    provisioner "shell" {
        inline = [
            "sudo apt-get install -y ca-certificates curl gnupg lsb-release",
            "curl -fsSL https://download.docker.com/linux/ubuntu/gpg | sudo gpg --dearmor -o /usr/share/keyrings/docker-archive-keyring.gpg",
            "echo \"deb [arch=$(dpkg --print-architecture) signed-by=/usr/share/keyrings/docker-archive-keyring.gpg] https://download.docker.com/linux/ubuntu $(lsb_release -cs) stable\" | sudo tee /etc/apt/sources.list.d/docker.list > /dev/null",
            "sudo apt-get -y update",
            "sudo apt-get install -y docker-ce docker-ce-cli containerd.io"
        ]
    }
}
user-data
#cloud-config
autoinstall:
  version: 1
  locale: en_US
  keyboard:
    layout: us
  ssh:
    install-server: true
    allow-pw: true
    disable_root: true
    ssh_quiet_keygen: true
    allow_public_ssh_keys: true
  packages:
    - qemu-guest-agent
    - sudo
  storage:
    layout:
      name: direct
    swap:
      size: 0
  user-data:
    package_upgrade: false
    timezone: Africa/Johannesburg
    users:
      - name: your-user-name # add your username here
        groups: [adm, sudo]
        lock-passwd: false
        sudo: ALL=(ALL) NOPASSWD:ALL
        shell: /bin/bash
        # passwd: your-password
        # - or -
        # ssh_authorized_keys:
        #   - your-ssh-key
99-pve.cfg
datasource_list: [ConfigDrive, NoCloud]Build Image With Packer
After you created the code repository and copied the files above we can run the following commands to validate the code and build our image.
packer validate -var-file=credentials.pkr.hcl ubuntu-server-focal-docker.pkr.hcl - to validate the code.
packer build -var-file=credentials.pkr.hcl ubuntu-server-focal-docker.pkr.hcl - to start the image-building process.
Once the build is complete the output should be similar to the output below:

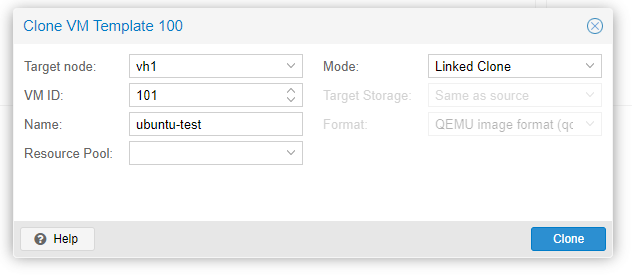
Once your template is ready you have the option to clone it and build a virtual machine or you can use Terraform code to build multiple virtual machines on Proxmox. For this example, we are going to build a virtual machine from the template with a custom configuration ie a static IP address using cloud-init. First, we right-click on the template and clone it:
Next, click on the cloned VM and navigate to the cloud-init config and update the IP address to a static IP address and click regenerate image:

Once all your cloud-init settings are configured you can boot up your virtual machine and it will configure the network via cloud-init. Once that process is completed you can access your Ubuntu Linux virtual machine via ssh.
Conclusion
In conclusion, Packer is a great tool for building images in Proxmox. It is easy to use and makes images that are consistent and reliable. If you enjoyed this article consider signing up for our newsletter and don't forget to share it with people that would find it useful. Leave a comment below with a tutorial you would like us to cover.