If you're someone that enjoys building out automation across your systems and platforms then this tutorial is one to have a look at. I like no scratch that I love Ansible automation and consider myself an Ansible Automation Junkie and use Ansible across all my self-hosted and cloud-hosted systems and applications. If you are new to system automation you might end up asking yourself what is Ansible? Ansible is an open-source configuration management and IT automation platform that automates provisioning, configuration management, application deployment, orchestration, and many other manual IT processes. Ansible uses a simple, agentless, and push-based automation model that makes it easy to deploy to a wide range of IT systems and platforms via SSH connections. Let's jump in and set up our Ansible Github repository and run an example automation playbook.
Create An Ansible GitHub Repository
The GitHub repository is to host all your Ansible code and even if you do not use Github you can set it up in other git version control systems such as GitLab or Gitea but for this tutorial, we are going to utilize Github. Follow the steps in this article to create a GitHub repository and call it something like ansible-repo or ansible-automation or any preferred suitable repository name. Once done clone the repo to your local machine and open it up in VS Code.
Install Ansible On Your Local System
If you use Mac OS or Linux you can follow the steps below to install Ansible and if you are using a Windows machine then ensure that you install Ubuntu Linux WSL and install Ansible on it. Once the installation completes move on to the next step to create all the configs and playbooks for your Ansible repository.
sudo apt-add-repository ppa:ansible/ansible
sudo apt update
sudo apt install ansible
Ansible Repository Configs And Files
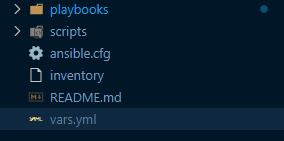
Create the following files in your Ansible repository:
1.playbooks
Create the playbooks directory to store all your playbooks and at this point if you are new to Ansible and do not know what playbooks are? A playbook is a collection of scripts and steps that automate workloads across systems or even locally as well. Playbooks are scripted and defined in yaml markup language where you can call custom code such as bash or python scripts for example. The flexibility of Ansible is incredible.
2.scripts
Create this directory to add bash, python or any other automation code and scripts that you can call in your playbooks. You can call this folder anything you but I think calling it scripts speaks to its use case.
3. ansible.cfg
This is the config file where we set our ansible defaults and in this instance, we will set the inventory where we will store remote machine IP addresses or DNS names to connect to and run automation workloads. Also in this file, we will set the ssh private key directory which is the ssh key that will connect to the remote systems. Below is an example that can be copied:
[defaults]

inventory = inventory
private_key_file = ~/.ssh/ssh_rsa
4. inventory
This is the file that hosts and groups all our remote machine connection data such as IP addresses or DNS names. Copy the example below and edit it with your remote systems data:
[all:vars]
ansible_user=ansible #add your ssh user coupled with your ssh key pair

[pi1]
192.168.1.151

[pi2]
192.168.1.152

[pi3]
192.168.1.153

[dh1]
192.168.1.154
5.vars.yml
This is a variables file that can be utilized to store values and called in your playbook workflows. Below is an example of a vars.yml file that can be copied and edited:
---
# global variables

#k8s
k8s_master: 192.168.1.33
k8s_worker_1: 192.168.1.34
k8s_worker_2: 192.168.1.35

#nginx
nginx_user: nginx
nginx_pass: nginx_pass

Run Example Playbook
So after everything is set up we can go ahead and create the playbook below that will run apt updates on Linux systems and we will specify that it should run these scripts on all systems in the inventory file. Call the playbook apt.yml as an example and copy the script below.
- hosts: all
  become: yes
  tasks:
    - name: apt
      apt:
        update_cache: yes
        upgrade: 'yes'
The next step is to run the following command in your vs code terminal to execute the playbook apt.yml:
ansible-playbook --key-file ~/.ssh/ssh_rsa -i inventory playbooks/apt.yml
Once the playbook workflow completes successfully you should see a similar output such as the output below.

Conclusion
In conclusion, Ansible is one of the most used open-source automation and configuration management software across industries. It integrates well with many services and has a large open-source community. If you enjoyed this article consider signing up for our newsletter and don't forget to share it with people that would find it useful. Leave a comment below with a tutorial you would like us to cover.

